BioMed Iraq BioMed Iraqمشاريع DIY

مشاريع DIY · DIY projects

تصميم نموذج اختبار لأجهزة الأشعة السينية (X-Ray Phantom)

الترجمة العربية كاملة · زر EN يعرض النص الأصلي في نفس الصفحة

فانتوم الأشعة

أجهزة الأشعة أنظمة معقدة، وتحتاج في الصيانة والإصلاح إلى معرفة واسعة وأدلة صيانة وأجهزة قياس مكلفة. لكن كثيراً ما لا تكون الفحوص الشاملة ضرورية: صورة اختبار واحدة بفانتوم أشعة موثوق تكفي.

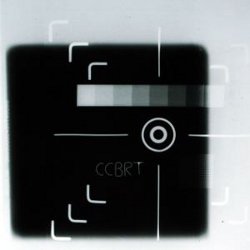
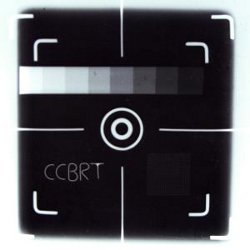
صورة الاختبار البسيطة هذه تُظهر لك:

من الأخطاء الشائعة أن يكون مرآة الكوليماتور غير مضبوطة، فتتوقف مطابقة شعاع الأشعة مع حزمة الضوء، ومن ثم يعرّض الفني تفصيلاً غير المطلوب.

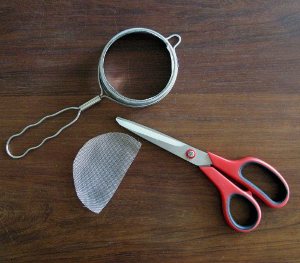
في هذه الحالة يلزم شبكة معدنية، فصورة هذه الشبكة تُظهر للفني مقدار الإزاحة واتجاهها لضبط المرآة.

ولفحص الثبات (constancy) يلزم إسفين ألمنيوم مدرّج (stepwedge): قضيب ألمنيوم يتناقص سُمكه درجةً درجة، فينتج تدرّج رمادي على صورة الأشعة. ويكون الجهاز سليماً عندما تكون الدرجات الرمادية متوازنة من الأبيض إلى الأسود. ويُصنع هذا الإسفين عادةً من كتلة ألمنيوم كاملة أو من شرائح ألمنيوم بأطوال مختلفة تُلصف معاً على شكل درج.

وأخيراً يجب أن تكون الصورة خالية من العيوب، كالبقع والظلال. وهذا يبدو بديهياً، لكن من الخبرة: حين يُخرج الجهاز صوراً رديئة يذهب تفكير الفنيين والمستخدمين فوراً إلى أنبوب الأشعة والوحدات المعقدة، ولا يفكر أحد في أبسط الاحتمالات: آلة التحضير والغرفة المظلمة. ففي البلدان النامية تنشأ مشاكل كثيرة في الغرفة المظلمة: بكرات متسخة، كيماويات قديمة، وأحياناً غرف مظلمة غير محكمة ضد الضوء.

الفانتوم داخل علبة قرص مدمج

فانتومات الأشعة التجارية مكلفة وضخمة، وتُصنع عادةً من لوحين زجاجيين فلا تتحمل العمل اليومي.

الحل هنا مبني على علبة قرص مدمج (CD jewel case): عملية، متوفرة في كل مكان، ومتينة. وإذا كانت العلبة شفافة يمكنك طباعة مخطط التركيب ووضعه تحت العلبة واستخدامه كاستنسل (stencil).
داخل الفانتوم
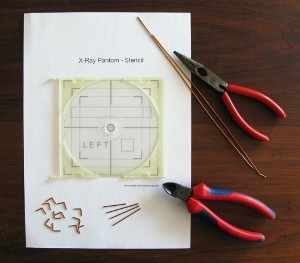
داخل العلبة: أسلاك نحاسية وإسفين الألمنيوم

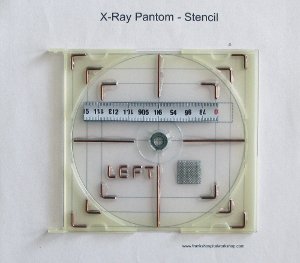
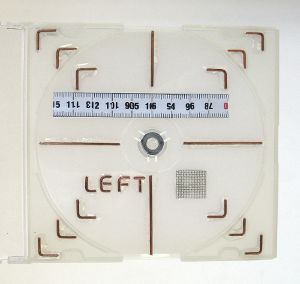
ألصقت داخل العلبة أسلاكاً نحاسية: صليب لنظرة عامة سريعة، وثلاثة مربعات بأحجام مختلفة على مسافة 1 cm. ويكون التعريض لاحقاً بالتركيز على المربع الأوسط.

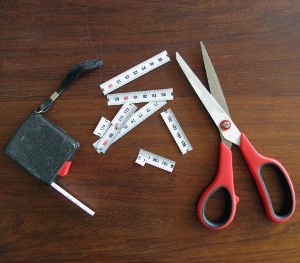
وتحتوي العلبة أيضاً على إسفين مدرّج، صنعته من شريط قياس معدني قديم قُطع بأطوال مختلفة باستخدام مقص منزلي، وهو أسهل لأن القياس والتعليم غير مطلوبين. وتُلصق الشرائح معاً بغراء فائق (super-glue).

تحضير الأسلاك وتثبيتها

خذ نصف متر من سلك التمديدات (2.5 mm² يكفي) وأزل العزل. ثم قوّم السلك: ثبّت أحد طرفيه في ملزمة والآخر في كماشة واسحب بقوة وبسرعة، فيصبح مستقيماً تماماً.

اثنِ واقطع القطع المطلوبة؛ قطع الزوايا لديّ بطول 1 cm.

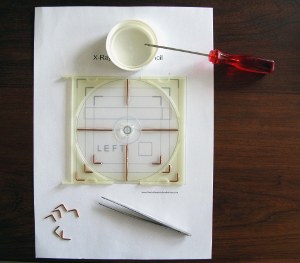
اطبع الاستنسل وضعه تحت العلبة، ثم امزج قليلاً من لاصق ثنائي المكوّن، وطبّقه على العلبة وضع قطع السلك في مواضعها. الملقط أو كماشة صغيرة يساعدان كثيراً.

بناء الإسفين المدرّج

قطعت 9 قطع من شريط القياس، تبدأ من 1 cm وتنتهي عند 9 cm، فينتج إسفين بعشر درجات (الدرجة الأولى بلا معدن). وتُلصق القطع بقطرة غراء فائق لكل شريحة.

والشبكة المعدنية والإسفين يُثبّتان بلاصق ثنائي المكوّن وفق الاستنسل، ويمكن تثبيت حلقة معدنية (washer) في الوسط أيضاً.

ولا تنسَ علامة تدلّ على الجهة الصحيحة للصورة: حرف بسيط أو اسم ورشتك.
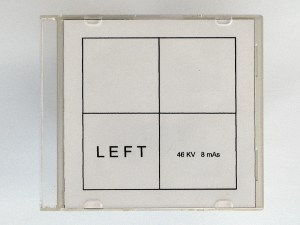
الفانتوم جاهز
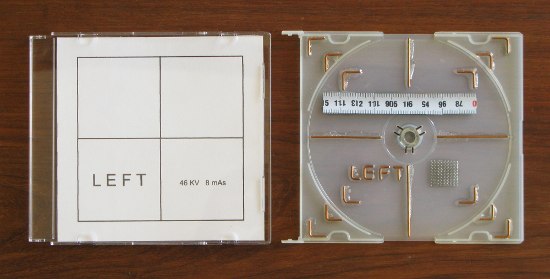
الفانتوم شبه جاهز — يبقى طباعة بطاقة القرص وإدخالها

المعايرة

يجب معايرة الفانتوم على جهاز أشعة سليم ومصان جيداً، بإجراء عدة تعريضات بإعدادات مختلفة. ويجب أن يكون التدرّج الرمادي متجانساً؛ فانتومي يعمل جيداً عند 46 kV و8 mAs.

الاستخدام

بعد إيجاد الإعدادات الصحيحة يصبح الفانتوم أداة للتحقق من بقية الأجهزة:

بقع على الصورة
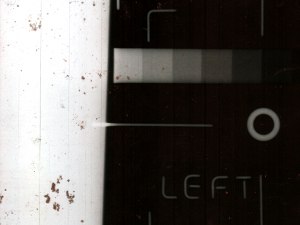
بقع على الصورة من جهاز حديث — السبب آلة التحضير لا الأنبوب

وليس جهاز الأشعة وحده هو سبب الصور الرديئة؛ ففكّر أيضاً في آلة التحضير والغرفة المظلمة.

القوالب والملفات المرفقة

قوالب الطباعة الأصلية لصنع الفانتوم — التصميم والمؤلف: Frank Weithöner:

تحميل الملف PDF · قالب الاستنسل تحميل الملف PDF · بطاقة علبة القرص
تحذير — إشعاع الأشعة السينية: هذا التصميم المنزلي أداة مساعدة بسيطة لفريقي الصيانة، وليس بديلاً معتمدًا عن أدوات فحص الجودة الرسمية (QA/QC) وأدوات المعايرة الأصلية مثل الدوسيمترات والفانتومات المخبرية. يجب إجراء فحوص التسريب والمعايرة الرسمية وفق معايير مؤسستك، وأي استخدام أو اختبار لأجهزة الأشعة يجب أن يبقى ضمن نطاق العاملين المؤهلين والرخصة القانونية لهم.
النص الإنجليزي الأصلي


Do-it-yourself

X-Ray Phantom
in a
CD jewel case


created by Frank Weithöner

X-ray machines are complex systems. For maintenance and repair you need a lot of knowledge, the service manuals and all the expensive test equipments.
However, it is often the case that a comprehensive check is not necessary. A simple test exposure with a reliable x-ray phantom is enough. Such a simple test image shows you:

 •  if the collimator is adjusted correctly
 •  whether or not the x-ray tube delivers sufficient radiation
 •  potential artefacts which are caused by the developing process

A common problem is that the mirror in the collimator is maladjusted. The consequence of this is that the x-ray beam and the light beam are no longer congruent and therefore, the radiographer exposes a different detail.
In this situation a metal grid is needed. The exposure of this metal grid shows the technician how much and in which direction he has to adjust the mirror.

For a constancy check an aluminium stepwedge is needed. This is an aluminium bar where its profile decreases step by step. The result is a greyscale on the x-ray image. The x-ray machine works fine when the grey-steps are well balanced, from white to black. Usually such a stepwedge is made out of a whole aluminium block or aluminium strips of different lengths that are put together to form a stair.


Finally, the image should be free from any artefacts, like stains and shades. This sounds ridiculous because it is so simple. However, from my experience, when a x-ray machine delivers poor images, technicians and users always immediately think of the x-ray tube and other complex units. They do not think about the simplest - the developing machine and the dark room. In developing countries, many problems arise in the dark room, for example: dirty rollers of the developing machine; old chemicals; and, believe it or not, no light-tight dark rooms.


The X-Ray Phantom in a CD jewel case


Commercial x-ray phantoms are expensive and bulky. Usually they are made out two glass panes and so they are not durable in day-to-day operation.


My solution for a DIY-X-Ray Phantom is made out of a CD jewel case. It is handy, available everywhere, and durable. Also, if you take a transparent case, you can easily use my solution as a stencil by printing out the construction plan and placing it under your CD case.
In this CD case I glued copper wires - a cross for a rough overview and three squares of different sizes at a distance of 1 cm. Later, the exposure will be done by focusing on the middle square.
Furthermore, the case contains a stepwedge. For building this stepwedge I simply took an old steel tape measure and cut it into different lengths. This can be done easily with household scissors. Also cutting is simplified because measuring and marking are unnecessary. The strips are put together with super-glue.


Preparation of the wire pieces.

Take half a meter of installation wire (2.5 square is fine) and remove the insulation. Then straighten the wire by clamping one end of the wire in a bench vise, holding the other end with a pair of pliers, and pulling quickly and firmly. The wire is now perfectly straight.
Bend and cut the needed wire pieces. My corner pieces have a length of 1 cm.


Putting wire pieces into place.

Print out the stencil and place it under the CD jewel case.
Mix a small amount of two component adhesive, apply the glue to the case and put the wire pieces into place. Forceps or a small pair of pliers is a great help.


Metal grid for resolution test.

Another idea was to insert a fine mesh to check the resolution. However, either the mesh was too fine or my idea was no good. The result after exposure was not what I expected. The lines are visible, but blurred... Ideas anyone?
Anyway the tea strainer is ruined :-)


Building the stepwedge.

I cut 9 pieces from the tape measure, starting with a length of 1 cm and ending with 9 cm. That makes a stepwedge with 10 steps (1st step no metal). The pieces are put together by using a drop of super-glue for each strip.


Final works.

The stepwedge and the metal mesh are fixed with two-component-adhesive according the stencil. In addition, a washer can be fixed in the center as well.
An indicator for the right side of the image must not be missed. It can be simple letter. Or why not the name of your workshop?

The x-ray phantom is almost finished. You only have to print out the CD inlay and insert it in the CD cover. Please check if the printout is in line with the wires.


Calibration


The x-ray phantom now has to be calibrated. Use a reliable and well maintained x-ray machine and make some exposures with different settings.
The greyscale should be homogeneous. My phantom works well at 46 KV and 8 mAs.


Usage


The usage is simple. Once the right settings are found out you can use the phantom to validate other machines.

 •  the greyscale must be homogeneous
 •  the exposure must be bordered by the second square
 •  the rest of the image must be free of stains and shades


By the way, the x-ray machine I used in our hospital is quite new. But look at this dirt on the image!
It is not always the x-ray machine which produces poor images. Think also of the film developer...


Tools


X-Ray Phantom Stencil

X-Ray Phantom CD Inlay

11 KB      Download

17 KB      Download


المصدر: Frank's Hospital Workshop — الصفحة الأصلية (توثيق) ↗ · العودة إلى المكتبة