
BioMed Iraq BioMed Iraqمشاريع DIY

مشاريع DIY · DIY projects

خزانة مجهر لمنع نمو الفطريات

الترجمة العربية كاملة · زر EN يعرض النص الأصلي في نفس الصفحة

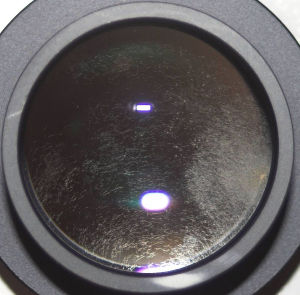
فطريات على العدسة
نمو الفطريات على سطح العدسة

المشكلة

في المناخات الحارة والرطبة تُظهر مجاهر المختبر صورة غير واضحة أو باهتة أو حليبية. وإذا حدث ذلك مع تنظيف العينيات والأهداف بانتظام، فالاحتمال كبير أن المجهر مصاب بالفطريات.

تنمو الفطريات على كل الأسطح الزجاجية في المناخات الحارة التي تتجاوز فيها الرطوبة النسبية 60% باستمرار، وهذا ينطبق على كل مختبر في المناطق الاستوائية غير المكيّفة.

وفي المجهر تتأثر كل عدسات العينيات والأهداف والموشور (prism). وبعد أن تنمو الفطريات يصبح إزالتها صعباً جداً: في المرحلة المبكرة يمكن إزالتها بسهولة، لكن الفطريات في بدايتها تكاد لا تُرى. وفي مرحلة لاحقة — حين تصبح الصورة باهتة — تصبح الإزالة صعبة أو مستحيلة. وتتطلب التلميع الميكانيكي مهارات خاصة، وهو يُتلف طلاء العدسة. وفي المرحلة الأخيرة تُنقش الأسطح وتتلف تلفاً غير قابل للإصلاح.

تستغرق عملية النمو شهوراً أو سنوات، لكن الوقاية يجب أن تبدأ بأسرع ما يمكن.

عوامل تشجّع النمو

والأشد سوءاً صناديق التخزين المغلقة والمظلمة أو الأغطية البلاستيكية الواقية من الغبار، حيث لا يحدث أي تدفق للهواء.

المختبر المكيّف يحل المشكلة، لأن المكيّف لا يبرّد الهواء فقط بل يخفض الرطوبة أيضاً، ويكفي أن يعمل خلال ساعات العمل لا 24 ساعة.

وعند غياب المكيّف — أي ارتفاع الرطوبة في ساعات العمل — يجب على الأقل «تكييف» التخزين الليلي: يوضع المجهر في خزانة خاصة فيها مصدر حرارة وفتحات تهوية. الحرارة تُنشئ انخفاضاً في الرطوبة داخل الصندوق وتدفقاً مستمراً للهواء، وفي هذه الظروف لا يمكن للفطريات أن تنمو.

طريقة العمل

للحصول على انخفاض ملموس في الرطوبة يجب رفع درجة الحرارة داخل الخزانة بمقدار 5 °C على الأقل، وهذا سهل بتركيب مصباح عادي في أعلى الخزانة، مع فتحات تهوية في الأعلى والأسفل تُنشئ تدفق هواء داخلها.

المصابيح المتوهجة ذات الفتيل السلكي لم تعد مستحسنة للإضاءة لأن مردودها الضوئي منخفض مقارنةً باستهلاكها: معظم الطاقة الكهربائية تتحول إلى حرارة لا إلى ضوء، والمصابيح الموفرة أفضل بكثير ويجب الاعتماد عليها. لكن في حالتنا هذه «العيب» ميزة، لأننا نستخدم المصباح كعنصر تدفئة رخيص ومتوفر في كل مكان.

وبحسب حجم الوعاء المستخدم كخزانة يمكن استخدام مصباح 40 W أو 60 W، مع مراعاة ألا تتجاوز حرارة داخل الخزانة 50 °C.

قياسات عملية

أجريت اختبارات على دلو بلاستيكي كبير، قست فيه الحرارة والرطوبة داخل الخزانة وخارجها:

المصباحارتفاع الحرارةانخفاض الرطوبة
40 W6 °C20%
40 W مع عاكس7 °C25%
60 W8 °C25%

وفي النهاية وقع الاختيار على مصباح 40 W مع عاكس معدني، وهو مجرد صفيحة معدنية متوفرة في السوق.

التركيب
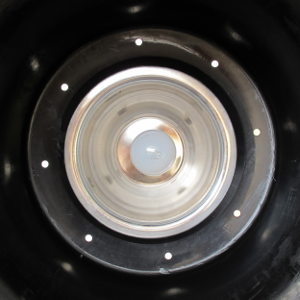
منظر داخلي
التركيب من الداخل

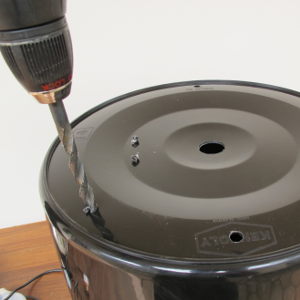
حفرت ثقوباً في قاع الدلو (أي أعلى الخزانة) وحول الحافة العلوية (أي أسفلها). أحجام الثقوب وعددها ليست حرجة، لكن لا تجعلها صغيرة أكثر من اللازم. والثقوب الكبيرة ليست مشكلة، لأن التهوية تعتمد على قدرة المصباح أكثر من اعتمادها على حجم الثقوب، والنظام يضبط نفسه بنفسه، ولا حاجة لمروحة إضافية.
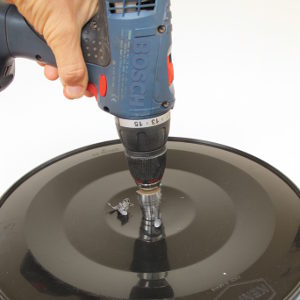
فتحة التهوية
فتحة التهوية العلوية

الاستخدام

الاستخدام بسيط: بدلاً من تغطية المجهر بالغلاف البلاستيكي في نهاية يوم العمل، يضع الفني الدلو على المجهر ويُشغل المصباح ويتركه طوال الليل. ترتفع حرارة الخزانة، وتنخفض الرطوبة، وينشأ تدفق هواء، فلا تنمو الفطريات.
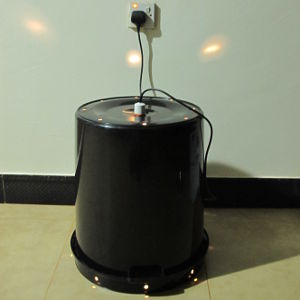
الخزانة النهائية
الحل النهائي

الشكل ليس أنيقاً، لكن الحل بسيط ورخيص وسهل التنفيذ. ويمكن بالطبع صناعة غطاء من الخشب المعاكس (plywood) بباب أمامي ليكون أجمل وأصغر.
النص الإنجليزي الأصلي


Do-it-yourself

Microscope Cabinet
for the Prevention of Fungus Growth


by Frank Weithöner


Fungus growth
In hot and humid climates laboratory microscopes often show an unclear, dull or milky image. If this happens, even when the eyepieces and objectives are regularly cleaned, it is very likely that the microscope is affected by fungus.
Fungus grows on all glass surfaces in warm climates where the humidity is permanently above 60%. This applies to all laboratories in tropical areas without air-conditioners.
In the case of the microscope, all eye-piece lenses, objectives and the prism are affected. Once the fungus has grown, removing it is very difficult. In the early stage it could be removed easily, however, fungus is hardly noticeable. Later, when the image becomes dull, it becomes very difficult or even impossible to remove the fungus. Mechanical polishing, which requires special skills, is necessary but this destroys the lens coating. In the final stage of fungus growth, the lenses surfaces are etched and irreversibly destroyed.
The fungus growth process takes time, months or years, but precautions should be made as early as possible.


The factors which support fungus growth are:

  warm and humid climates (> 60% relative humidity)
  unventilated storage
  storage in dark rooms

Particularly bad are closed (and dark) microscope storage boxes or plastic dust covers where no air flow takes place.
An air-conditioned laboratory would solve this problem, because an air-conditioner not only cools the room down but also reduces the humidity. It is, by the way, enough that the A/C runs during working hours. A 24-hour air-conditioning is not necessary.
When an A/C is not present, and thus the humidity is high during working hours, then at least the storage over night should be 'air-conditioned' i.e. the microscope is put in a special cabinet with a heater and ventilation holes. The heat creates a humidity drop inside the box and a continues airflow. Under these conditions fungus can not build up any longer.


How it works
In order to achieve a considerable drop in humidity, the temperature inside the cabinet has to be increased by a minimum of 5°C. This can be done easily by mounting a standard light bulb in the top of the cabinet. Additional ventilation holes in the top and in the bottom create an air flow inside the cabinet.
A light bulb (incandescent light bulb with a wire filament) should be avoided for lighting purposes nowadays because the luminous efficiency is relatively small compare to the power consumption. The major part of the electrical power is not converted into light but into heat. Energy saving bulbs are much more efficient and they should be taken only. But in our case the old fashion light bulb is an advantage because we use the light bulb as a heating element which is extremely cheap and (still) available everywhere.
Depending on the size of the container which we want to use as a microscope cabinet, a 40 W or a 60 W type can be used. It has to be taken into account that the temperature in the interior of the cabinet should not exceed 50°C.
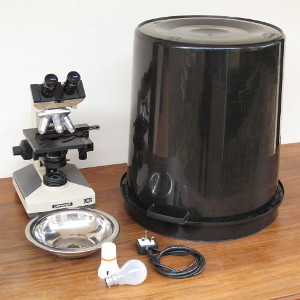
I bought a big plastic bucket at the local market and did some tests where I measured the humidity and temperature inside and outside the cabinet.

Light bulb Temperature rise Humidity drop
40 W 6°C 20%
40 W with reflector 7°C 25%
60 W 8°C 25%

In the end I decided to use a 40 W bulb with a metal reflector. This reflector is nothing else than a metal plate, also found at the market.


The construction
I drilled holes in the bottom of the bucket (the top of the cabinet) and around the rim (the bottom). The sizes and the number of holes are not critical. But do not make them too small. Too big is no problem because the ventilation depends more on the power of the lamp than on the size of the holes. The system controls itself. An additional fan is not needed.


The usage is easy. Instead of covering the microscope with the plastic cover at the end of a working day, the microscopist now puts the bucket over the the microscope, switches on the light and keeps it switched on over night. The temperature in the cabinet rises, the humidity drops, an air flow comes into being and fungus can not grow.


OK, the bucket does not look elegant, but the solution is simple, cheap and easily done. A custom-made plywood cover hood, perhaps with a front door would be, of course, much nicer and smaller.

المصدر: Frank's Hospital Workshop — الصفحة الأصلية (توثيق) ↗ · العودة إلى المكتبة