BioMed Iraq BioMed Iraqمشاريع DIY

مشاريع DIY · DIY projects

كاشف أشعة سينية بسيط الصنع

الترجمة العربية كاملة · زر EN يعرض النص الأصلي في نفس الصفحة

الفكرة

بعد رحلة إلى أفريقيا في 2008، اتضح أن كثيراً من المستشفيات لا تملك أي وسيلة لقياس خرج جهاز الأشعة. ولأن معظم مهندسي الأشعة وفنيي التصوير يستخدمون شاشات فلورية (fluorescent screens) للتأكد من وجود خرج للأشعة من الأنبوب، تساءل إن كان ذلك يمكن تطويره ليعطي نتائج قابلة للقياس.

الكاشف الموصوف يعمل بأفضل صورة مع راسم إشارة (oscilloscope) أو برنامج راسم إشارة عبر كرت صوت الحاسوب، ويعمل أيضاً مع مقياس رقمي (DVM) أو فولتميتر تناظري. كل القطع المستخدمة وُجدت أو جُلبت محلياً، والأرجح توفرها في معظم البلدان.

تحذير: أجهزة الأشعة خطرة إن لم تُستخدم بالشكل الصحيح. استخدم الحماية من الإشعاع في كل وقت. هذا المقال موجّه للفنيين والمهندسين الذين تلقّوا تدريباً على استخدام أجهزة الأشعة وسلامتها.

القطع المطلوبة

التركيب

  1. اختبر الخلية الكهروضوئية في ضوء النهار للتأكد من أنها تعطي خرجاً، وحدّد القطبين الموجب والسالب.
  2. اختبر الشاشة الفلورية للتأكد من أنها تتوهج عند تعرّضها للأشعة. معظمها يتوهج بالأزرق أو الأخضر، وشدة التوهج تعتمد على تركيبها الكيميائي.
  3. توضع الشاشة بوجهها الفلوري مقابل الوجه الحساس للضوء في الخلية، وتُثبّت بشريط لاصق كهربائي. شريط Gaffer أو Tesa أفضل، وأي شريط كهربائي يكفي لأن وظيفته منع دخول الضوء.
  4. قِس الخرج مرة أخرى في ضوء قوي — يجب أن تكون القراءة صفراً إذا مُنع الضوء تماماً.
  5. ضع التركيب كله في صندوق مناسب، وأخرج السلك من ثقب محفور في الصندوق.
  6. صِل الكاشف بمقياس أو راسم إشارة، واضبط المدى على الجهد المناسب (ابدأ بـ 200 mV).
  7. ضع الكاشف تحت أنبوب الأشعة على مسافة نحو 500 mm من البؤرة (focal spot). المسافة ليست حرجة، وقد يلزم التقريب مع الأجهزة ضعيفة الخرج.
  8. اضبط الجهاز على 70 kV و50 mA وزمن 1 ثانية — أو ما تسمح به أجهزتك.
  9. أجرِ تعريضاً (exposure) وأنت تراقب المقياس أو راسم الإشارة.

القراءة المتوقعة بين 100 و200 mV تقريباً، وتعتمد على الشاشة والخلية المستخدمتين. هذا ليس جهاز قياس دقيق، لكنه مع راسم الإشارة يعطيك مؤشراً معقولاً على خرج جهاز الأشعة.
النص الإنجليزي الأصلي
Recently I received an email from Keith Feay in which he introduced his simple made X-ray detector. Here his building instruction:


Do-it-yourself


A simply made
X-Ray Detector
made from readily available materials


created by Keith Feay

Following a trip I made to Africa in 2008 it became obvious that many hospitals had no means of measuring X-ray equipment output. As most X-ray engineers and radiographers use fluorescent screens to check if there is an output from the tube, I wondered if this could be extended to produce some measurable results.
The detector described will work best with an oscilloscope or PC soundcard oscilloscope software but it also works with a DVM or analogue voltmeter. As I live in the UK all the parts used have been found or acquired locally. I am sure that the parts required will be available in most parts of the world.


X-ray equipment can be dangerous if not used correctly. Please use radiation protection at all times. This article is intended for those technicians and engineers who have had some training in the use and safety of x-ray machines.


Parts required


 •  Fluorescent screen from an X-ray cassette.
    On my trip to Africa I found several damaged cassettes in all x-ray departments. Most
    were beyond repair but had good fluorescent screens.
 •  Small Photo Voltaic cell.
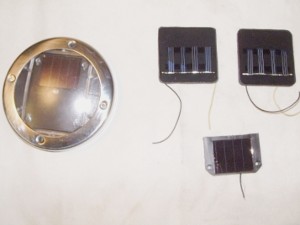
    A good source of these is the cheap garden lights sold in UK £1 shops.
    Any small cell (up to 5cm square will do) its voltage output in daylight should be around
    2.5 volts but this is not critical.
 •  A box to put the whole assembly into.
    Plastic medicine boxes are useful for this any are usually available in most hospitals.
 •  Twin cable and suitable plugs for the oscilloscope / meter.
    Screened cable is best but if not available the twist 2 thin wires together.


Assembly


Test your photocell in daylight to ensure that you get an output. Mark the positive and negative poles.
Test your fluorescent screen to make sure that it glows when exposed to x-rays. Most glow blue or green and the brightness depends on their chemical composition.
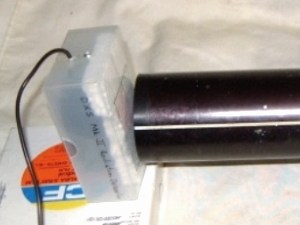
The screen is placed fluorescent side against the light sensitive side of the photocell and held in place with electrical tape. The cloth Gaffer tape or Tesa tape is best but any electrical tape will do as its purpose is to keep out light.
Measure the output again in strong light the reading should be zero if all light has been successfully excluded.
Place the whole assembly in a suitable box with the lead exiting through a hole drilled in the box.
Connect the detector to a meter or scope.
Place the detector under the X-ray tube. At about 500mm from the focal spot.
The distance is not critical and may need to be closer with a low output unit.
Switch the meter / scope to the suitable voltage setting. (Try 200mV)
Set the x-ray machine to 70kV 50mA and 1 second or whatever you can on your machine.
Make an Exposure whilst watching the meter / scope.
You should get a reading of approximately 100 to 200 mV depending on the screen and the cell used.
This is not a precision instrument but will when used with an oscilloscope give you a reasonably indication of the output from an x-ray machine.


Complete solar light on the left. Cells on the right.


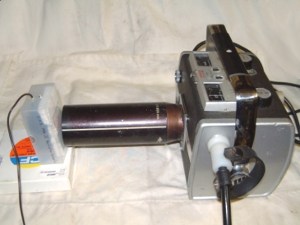
Completed test box on left used to check a portable x-ray unit.


Thanks Keith!
Questions and remarks please directly to Keith.


المصدر: Frank's Hospital Workshop — الصفحة الأصلية (توثيق) ↗ · العودة إلى المكتبة